
Among the vintage ornaments I have, there are several really simple ones that were made by my grandma or great-grandma in the 60’s or 70’s. After my mom mentioned that she had had an outfit made out of one of the fabrics, it occurred to me that these trees would be great to make with some of the left over material and fabric scraps from various project I had made this year. Going through my fabrics I choose two prints, one from this blouse and another from a dress I have yet to share, and happily set about coming up with this tutorial. So if you want to make one of these adorable trees put on some Christmas music and follow the directions below!
Supplies
² Small pieces of fabric scraps
² Stuffing (I’m using
fiberfill, but anything that gives it body and will go into corners will work)
² 7 in. of 1/8 in.
ribbon
² Thread that matches your
fabric
² Small decorative things:
ric-rac, lace, bias tape, seed beads, pearls, sequins, etc…
Instructions
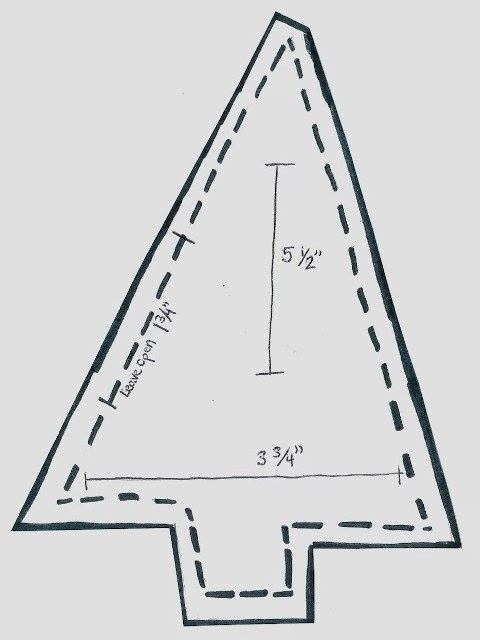
1. First,
decide what you want your tree to look like and create a template (I’m
including mine if you don’t want to come up with your own). Make sure to leave
at least a ¼ inch seam allowance.

2. Place the template on the fabric and
cut out two, making sure to flip template when you cut the second shapes so the
two pieces will match up when you put them together to sew.

 |
| I didn't iron until after I cut them, I would recommend doing that first, though. |
3. Put the
right sides of the fabric facing each other. Starting at the bottom of where
the opening on the side will be, sew the two pieces together ¼ inch from the
edge. (Make sure to leave the 1 ¾ inches on the side open!).


4. Before
turning, iron the seam back on the open side to form a crease. This will make
it easier to stitch shut.

5. Clip the corners/curves (don’t forget to clip the
corners at the top of the trunk). Then turn. Poke out corners as much as
possible (rods from tube turner sets are great for this if you’re concerned about
poking scissor tips or seam rippers through).
6. Fill and slip stitch the
opening shut.

7. Form a loop with your ribbon and sew it by hand to the top.
8. Now comes the fun part! Use your various
trims and decorate. For trim that goes round the tree diagonally, start at the
bottom and pin it as you wrap it around.
 |
| For the red I used ric-rac and seed beads. For the pink, fused pearls. |
9.
Hang your tree on the tree!
 |
| Two vintage and two new! |
If
you liked this ornament make sure to check out last year’s tutorial On Making a Vintage Look-alike Snowman Ornament. ♥♥♥
I really wish I was craftier. Everything you make is so darn cute!
ReplyDeleteThat's so sweet of you to say!
DeleteThese are so wonderfully cute!!! I think that they would also be darling handing from a door handle or cupboard nob, especially if (like us due to a puppy that eats everything in sight) you weren't putting up a tree this year.
ReplyDeleteI totally second Sean, everything you make is so wonderfully cute and pretty.
♥ Jessica
Oh, I hadn't even thought of that, but it's a fantastic idea! (it's funny because I actually have an ornament hanging on the door stop at the top of my bedroom door).
DeleteAww, thank you!