Friday, December 28, 2012

On My After Christmas Thrifting

In the days following Christmas, I generally have no urge to leave the house, preferring instead to stay away from the hustle and bustle of the after Christmas shoppers. Yesterday, however, I decided to venture to the thrift store with the intention of buying a vintage belt I had looked at a few weeks ago if they still had it. Fortunately, the belt was still there and, in addition to it, I managed to find a few other things.


With its delicate leaves and dainty pearl center this pretty flower pin caught my eye! Pictured alongside it is my newly acquired belt with the cute flower on the buckle.


I remembered having seen these darling mittens last year, but decided not to buy them.  This year, though, I just couldn’t pass up on them, especially with the half-off price of $1.50!
 
I also found some lovely Christmas time magazines from 1959, ’60, ’65, and ’66, which were also half-off. I predict there will be sheep sewing in the coming year. :)


And finally, my impractical purchase, which based on the ILGWU label, was made between 1975 and 1995 (the sleeves reminded me of something Myrna Loy would wear despite the fact that it’s completely the wrong decade). It needs a bit of repair on some of the seams, but overall it's in great condition. Now if only I had someplace to wear it…
 

And there you have it, the results of my after Christmas shopping! I hope all of you who went out had just as much success!

Sunday, December 23, 2012

On Making a Vintage Look-Alike Snowman Ornament


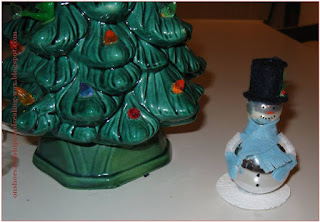
When looking through one’s family ornaments, there are often ones that bring about the feeling that it would easy to make one or at least one similar to the original. And, thus, because of this, we have today’s post on how to make a snowman ornament that looks like these vintage ones.

 Mr. Clown and Santa (who unfortunately took a tear inducing tumble yesterday and is in need of a new vintage ornament body)
 
Vintage Look-Alike Snowman

Supplies

ªMedium sized glass ball ornament
ª Small glass ball ornament (the size used on miniature trees)
ª Cardboard (corrugated is best)
ªCraft glue*
ªA white or black pipe cleaner
ªBlack felt (the stiff type since this will be for the hat)
ªFelt of any color (for scarf and mittens)
ªSingle strand of embroidery floss and needle
ªWhite, black, and orange acrylic paint and paint brush
ªGlitter (optional)
ªSmall piece of green feather (optional)
ªThree red seed beads (optional)

*For securing the pipe cleaner and ornament to the base and attaching the ornaments together, hot glue can be used for an extra strong and quick drying hold. I would not recommend using hot glue for any of the other steps, though as everything is on too small a scale.  

Instructions
Making the base
1.       Cut a circle about two inches in diameter from the cardboard and paint it white. It you want it to be sparkly add glitter while the paint is still wet!
2.       Take the pipe cleaner and wrap just enough of it around your index finger to form a ring. Remove it from your finger and cut off the extra amount. (If you want your snowman to have feet, make two smaller rings.) 
3.       Take the ring and glue it to the center of the cardboard base. This will keep your ornament stabilized.
 
Building the body
4.       Take the larger ornament and very carefully remove the metal top and loop.
5.       Glue the ornament to the pipe cleaner on base with the top facing upward. This will serve as the neck and provide something to balance the head on!
 
6.       Take the smaller ornament and glue it to the neck with the metal loop facing upward.
7.       If you want your snowman to have arms, cut two pieces off the remaining pipe cleaner and glue them flat against the sides.

Dressing the Snowman

                The scarf and mittens
 
8.      To make the scarf cut a piece of felt that is 4 ¼” by ¾”. Make the fringe by cutting small slits about ½” in on the ends.
9.        Put glue around the neck of the ornament and wrap the scarf around it overlapping the ends making sure to glue them to the ornament as well.
10.   Cut out tiny mittens and glue them to the side or the arms

The hat-measurements may vary on this part so before gluing anything make sure you check the height of the strip that forms the hat to ensure it is at least as high or higher than the loop for hanging the ornament. 
11.    Using the black felt cut out a small circle (about 1 ¼” or 1 ½”) for the hat brim that is slightly larger than the diameter of the ornament being used for the head. Cut a hole in the center of it so the top of the ornament can poke through and it can rest nicely on the head12.    Cut a strip of felt about ¾” wide and 3 ¼” long. Roll it to make it the right size to fit the hat rim and glue the overlapping ends.
13.    Glue the part that makes up the hat to the hat brim. This part can be a bit tricky because you want enough glue to keep the pieces together, but don’t want it oozing out.
Steps 13 and 14
 
14.    Cut a 9 inch piece of thread and fold it in half at the middle so you have a loop at the end.  Take the end with the loop and thread it through the ornament hanging loop. Put the other end of the thread through the loop and pull so the thread is securely attached to the ornament.
15.    Take the hat piece and place it (don’t glue it) on the snowman’s head, making sure to have the thread coming out through the top.
16.    Glue the rim and hat piece to the head.
17.    Cut another small circle to make the top of the hat. Do NOT glue it on yet!!!
Step 18
 
18.   Thread the needle with the loose ends. Taking the top of the hat pull the needle through the center. Remove needle and tie a double knot in the thread at the length desired, so you’ll now have something to hang the ornament with.
19.    Glue the top of the hat to the main hat piece making sure the overlap is at the back.
 
Finishing Details
20.       Paint on eyes, nose, mouth, buttons, and any other details you might want to include.
21.      
22.      Hang it on the tree and enjoy!
 

Saturday, December 8, 2012

On Fun Ideas For Making Christmas Cards

With Christmas fast approaching the scramble to get cards out before the day arrives has come and, if you love crafting, there’s nothing more fun that making those cards! For those who have not started to send out cards already or who still have to find a card for someone special here are some ideas:
 
ªMake a Collage
At this time of year there seems to be no end to the Christmas images you can find in magazines not to mention the plethora available online and elsewhere. Because of this one has a wide array of options available that will suit any number of friends and relatives no matter their personal tastes.
 
A personal favorite (as of last week) is the use of vintage paper dolls (in particular Betsy McCall paper dolls from the 1950’s), which can be easily found online, printed, and cut out. Not only does this option provide a classic look, but frequently provides you with a way to set up small “scenes” as various things such as dogs, trees, and ornaments among other things accompany the dolls in each set.
 
A collage card also allows one to make use of various odds and ends that might be in their craft supplies, such as ribbons, buttons, colored paper, and fabric scraps.
 
ªUse Stenciling
While one may have the tendency to associate stenciling with early childhood and the decorating of woodwork or walls, it presents a wide range of options for Christmas cards as well. One might simply trace the design onto the paper to use it as an outline. Or one might be inclined to daub paint or chalk around the stencil to give it a look that isn’t quite as sharp.
 
Stenciling can also be used in tracing a shape to cut out of the actual card, which can then be backed with another contrasting color. Or it can be used to cut out a shape you want to put on a card.
 
ª Make a Postcard
It’s customary to receive photo cards this time of year, but how many postcards usually grace the place where Christmas cards are displayed?  All one needs is a piece of cardstock cut to the right size and a ruler and pen/marker to draw the line on the back. Then decorate the front as you would a regular card.
 
As a reminder, if one doesn’t want to mail it as a postcard (or have gone overboard on decorating it) it can always be mailed in an envelope. And make sure if you do mail it as a postcard that you put the right amount of postage!
 
ªGlue and Glitter
Just like when you were little, drizzle the glue in the shape or outline you want and pour the glitter on. Gently shake the glitter off by lightly tapping the paper and one will find themselves with a very pretty and delicate looking card. This method works especially well for snowflake cards!
 
ª Make Use of Those Doilies, Tissue Paper, Etc.
Somewhat along the same lines as the collage card, most crafters have a variety of things in their supplies that have been collected with no specific purpose in mind or are leftover from another project. And, if one plans to give their card to someone in person or is willing to pay a bit more in postage, this presents the option to make a card with a bit more dimension. Here are just a few suggestions:
Doilies can be cut out into snowflakes or make a nice background on their own.
A festive poinsettia can be made by crunching little squares on the end of a pencil and then gluing them to paper.
 
Chipboard letters and raised stickers add a nice touch.
Attach an ornament (a flat one, that is, such as one made of paper or felt) or pin to the front of the card. Not only does this provide a card for the recipient, but an unexpected gift as well.
 
These are only a few favored ideas, but as can be seen the possibilities are endless and really there is no limit to what one can create! Happy card making and receiving!