Friday, December 28, 2012

On My After Christmas Thrifting

In the days following Christmas, I generally have no urge to leave the house, preferring instead to stay away from the hustle and bustle of the after Christmas shoppers. Yesterday, however, I decided to venture to the thrift store with the intention of buying a vintage belt I had looked at a few weeks ago if they still had it. Fortunately, the belt was still there and, in addition to it, I managed to find a few other things.


With its delicate leaves and dainty pearl center this pretty flower pin caught my eye! Pictured alongside it is my newly acquired belt with the cute flower on the buckle.


I remembered having seen these darling mittens last year, but decided not to buy them.  This year, though, I just couldn’t pass up on them, especially with the half-off price of $1.50!
 
I also found some lovely Christmas time magazines from 1959, ’60, ’65, and ’66, which were also half-off. I predict there will be sheep sewing in the coming year. :)


And finally, my impractical purchase, which based on the ILGWU label, was made between 1975 and 1995 (the sleeves reminded me of something Myrna Loy would wear despite the fact that it’s completely the wrong decade). It needs a bit of repair on some of the seams, but overall it's in great condition. Now if only I had someplace to wear it…
 

And there you have it, the results of my after Christmas shopping! I hope all of you who went out had just as much success!

Sunday, December 23, 2012

On Making a Vintage Look-Alike Snowman Ornament


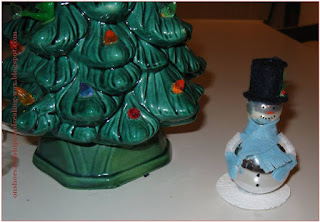
When looking through one’s family ornaments, there are often ones that bring about the feeling that it would easy to make one or at least one similar to the original. And, thus, because of this, we have today’s post on how to make a snowman ornament that looks like these vintage ones.

 Mr. Clown and Santa (who unfortunately took a tear inducing tumble yesterday and is in need of a new vintage ornament body)
 
Vintage Look-Alike Snowman

Supplies

ªMedium sized glass ball ornament
ª Small glass ball ornament (the size used on miniature trees)
ª Cardboard (corrugated is best)
ªCraft glue*
ªA white or black pipe cleaner
ªBlack felt (the stiff type since this will be for the hat)
ªFelt of any color (for scarf and mittens)
ªSingle strand of embroidery floss and needle
ªWhite, black, and orange acrylic paint and paint brush
ªGlitter (optional)
ªSmall piece of green feather (optional)
ªThree red seed beads (optional)

*For securing the pipe cleaner and ornament to the base and attaching the ornaments together, hot glue can be used for an extra strong and quick drying hold. I would not recommend using hot glue for any of the other steps, though as everything is on too small a scale.  

Instructions
Making the base
1.       Cut a circle about two inches in diameter from the cardboard and paint it white. It you want it to be sparkly add glitter while the paint is still wet!
2.       Take the pipe cleaner and wrap just enough of it around your index finger to form a ring. Remove it from your finger and cut off the extra amount. (If you want your snowman to have feet, make two smaller rings.) 
3.       Take the ring and glue it to the center of the cardboard base. This will keep your ornament stabilized.
 
Building the body
4.       Take the larger ornament and very carefully remove the metal top and loop.
5.       Glue the ornament to the pipe cleaner on base with the top facing upward. This will serve as the neck and provide something to balance the head on!
 
6.       Take the smaller ornament and glue it to the neck with the metal loop facing upward.
7.       If you want your snowman to have arms, cut two pieces off the remaining pipe cleaner and glue them flat against the sides.

Dressing the Snowman

                The scarf and mittens
 
8.      To make the scarf cut a piece of felt that is 4 ¼” by ¾”. Make the fringe by cutting small slits about ½” in on the ends.
9.        Put glue around the neck of the ornament and wrap the scarf around it overlapping the ends making sure to glue them to the ornament as well.
10.   Cut out tiny mittens and glue them to the side or the arms

The hat-measurements may vary on this part so before gluing anything make sure you check the height of the strip that forms the hat to ensure it is at least as high or higher than the loop for hanging the ornament. 
11.    Using the black felt cut out a small circle (about 1 ¼” or 1 ½”) for the hat brim that is slightly larger than the diameter of the ornament being used for the head. Cut a hole in the center of it so the top of the ornament can poke through and it can rest nicely on the head12.    Cut a strip of felt about ¾” wide and 3 ¼” long. Roll it to make it the right size to fit the hat rim and glue the overlapping ends.
13.    Glue the part that makes up the hat to the hat brim. This part can be a bit tricky because you want enough glue to keep the pieces together, but don’t want it oozing out.
Steps 13 and 14
 
14.    Cut a 9 inch piece of thread and fold it in half at the middle so you have a loop at the end.  Take the end with the loop and thread it through the ornament hanging loop. Put the other end of the thread through the loop and pull so the thread is securely attached to the ornament.
15.    Take the hat piece and place it (don’t glue it) on the snowman’s head, making sure to have the thread coming out through the top.
16.    Glue the rim and hat piece to the head.
17.    Cut another small circle to make the top of the hat. Do NOT glue it on yet!!!
Step 18
 
18.   Thread the needle with the loose ends. Taking the top of the hat pull the needle through the center. Remove needle and tie a double knot in the thread at the length desired, so you’ll now have something to hang the ornament with.
19.    Glue the top of the hat to the main hat piece making sure the overlap is at the back.
 
Finishing Details
20.       Paint on eyes, nose, mouth, buttons, and any other details you might want to include.
21.      
22.      Hang it on the tree and enjoy!
 

Saturday, December 8, 2012

On Fun Ideas For Making Christmas Cards

With Christmas fast approaching the scramble to get cards out before the day arrives has come and, if you love crafting, there’s nothing more fun that making those cards! For those who have not started to send out cards already or who still have to find a card for someone special here are some ideas:
 
ªMake a Collage
At this time of year there seems to be no end to the Christmas images you can find in magazines not to mention the plethora available online and elsewhere. Because of this one has a wide array of options available that will suit any number of friends and relatives no matter their personal tastes.
 
A personal favorite (as of last week) is the use of vintage paper dolls (in particular Betsy McCall paper dolls from the 1950’s), which can be easily found online, printed, and cut out. Not only does this option provide a classic look, but frequently provides you with a way to set up small “scenes” as various things such as dogs, trees, and ornaments among other things accompany the dolls in each set.
 
A collage card also allows one to make use of various odds and ends that might be in their craft supplies, such as ribbons, buttons, colored paper, and fabric scraps.
 
ªUse Stenciling
While one may have the tendency to associate stenciling with early childhood and the decorating of woodwork or walls, it presents a wide range of options for Christmas cards as well. One might simply trace the design onto the paper to use it as an outline. Or one might be inclined to daub paint or chalk around the stencil to give it a look that isn’t quite as sharp.
 
Stenciling can also be used in tracing a shape to cut out of the actual card, which can then be backed with another contrasting color. Or it can be used to cut out a shape you want to put on a card.
 
ª Make a Postcard
It’s customary to receive photo cards this time of year, but how many postcards usually grace the place where Christmas cards are displayed?  All one needs is a piece of cardstock cut to the right size and a ruler and pen/marker to draw the line on the back. Then decorate the front as you would a regular card.
 
As a reminder, if one doesn’t want to mail it as a postcard (or have gone overboard on decorating it) it can always be mailed in an envelope. And make sure if you do mail it as a postcard that you put the right amount of postage!
 
ªGlue and Glitter
Just like when you were little, drizzle the glue in the shape or outline you want and pour the glitter on. Gently shake the glitter off by lightly tapping the paper and one will find themselves with a very pretty and delicate looking card. This method works especially well for snowflake cards!
 
ª Make Use of Those Doilies, Tissue Paper, Etc.
Somewhat along the same lines as the collage card, most crafters have a variety of things in their supplies that have been collected with no specific purpose in mind or are leftover from another project. And, if one plans to give their card to someone in person or is willing to pay a bit more in postage, this presents the option to make a card with a bit more dimension. Here are just a few suggestions:
Doilies can be cut out into snowflakes or make a nice background on their own.
A festive poinsettia can be made by crunching little squares on the end of a pencil and then gluing them to paper.
 
Chipboard letters and raised stickers add a nice touch.
Attach an ornament (a flat one, that is, such as one made of paper or felt) or pin to the front of the card. Not only does this provide a card for the recipient, but an unexpected gift as well.
 
These are only a few favored ideas, but as can be seen the possibilities are endless and really there is no limit to what one can create! Happy card making and receiving!      

Monday, November 26, 2012

On Thanksgiving Leftovers

Following a big holiday there are always leftovers and Thanksgiving is no exception to this. The spread that was beautiful on the actual day becomes a long drawn out meal and while some foods are more than welcome, others become overwhelmingly tiresome. However, with these leftovers one can find a number ways to break up the monotony! Soups, sandwiches, and salads all offer one with a way to use up the vast quantities of turkey that never seem to end. For one who is incredibly fond of it, cranberry sauce can make a delightful spread for a piece of bread or a roll. Dependent on the vegetables they might be served with another meal or like the turkey be used in a soup. And if you want to make use of all of the above, there is always the popular choice of creating a turkey sandwich with cranberry sauce, stuffing, and gravy, all on a delicious roll and accompanied by a left over side dish! And with that, no matter the way one eats their leftovers, one could find no better way to finish their meal than with a slice of pie should any still remain.

Happy last week of November!

Monday, November 5, 2012

On Buttons

Buttons come in a variety of shapes, sizes, colors, and materials. They can be functional or decorative, providing one with a way to keep something fastened or providing one with a nice accent for a pillow. As a small child, buttons may serve as playthings that fascinate and keep one occupied for many a happy hour. And as an unintended risk, can lead to a lifetime fondness of old buttons.

In sewing, buttons can have a great impact on how quickly a project will be finished. Because one will be wearing the buttons attention should be paid to how well matched the buttons are to the type of project. One, for example, would not use gold buttons with anchors on a pink gingham square dancing dress (which leaves the new owner with the task of replacing them). In finding the right buttons, button holes are then to be considered and from there the attachment of the buttons to the garment. In creating button holes, especially of the bound button hole variety, size of the button should always be considered least the button prove too small to stay in place once buttoned. Attachment of the button should also be carefully carried out to avoid incorrect placement, which would be nearly as bad as the button being too small, and to avoid them being too tightly or too loosely attached.

So, while one may take buttons for granted, they are indeed most important. And even if one is not using them for sewing or some sort of craft, one may find themselves recalling fond childhood memories of playing Button, Button, Who’s Got the Button? on a rainy day or being reminded of a fairy tale character’s confusion over the shiny yellow buttons buried in the garden.

Monday, October 8, 2012

On Dressing Up For No Particular Reason

Another interlude from this blog’s regular writing style…

Sometimes one feels the urge to dress up for absolutely no reason and this morning, despite the fact that I am not going anywhere today, I decided that I wanted to wear my most formal and one of my most favorite of my vintage dresses. This then led to a whirlwind search for items to create the perfect outfit in places ranging from in the closet, under the bed, and in the dresser.

While I have worn this dress before, I have never gone through the effort to add all the accessories that I did today. They are a bit a mixed in as far as time period goes— I’m guessing the dress is probably 60’s, gloves are 40’s or 50’s, sunglasses are 60’s, and hat and shoes are present day--but in this case I don’t think it looks all that bad and it is all the same color scheme. The only things I think I’d do differently next time I wear this is to skip the earrings (one can only wear clip-on earring so long) and maybe try to find a hair style other than a doubled up ponytail because while cute my hair likes to loosen itself from the hair band. All in all, though, I am happy with the overall look and now that the weather is cooling down I will certainly be wearing this dress more often!
Proof that I have been watching too many film noirs lately,
although I suppose femme fatales don't normally wear sunglasses. 

Outfit details
Jo Lester dress: Thrift store find (a very exciting one at $6, I might add!)
Sunglasses, clip-on earrings, and ring: Formerly my grandma’s
Pearls: Gift from my grandma when I was little
Crescendoe Leather Tailored gloves: Gift from my grandma’s friend to play dress-up with when I was little
Hat: Amazon
Photos taken by my mother

Monday, September 24, 2012

On Scarecrows

With the arrival of autumn come thoughts of crisp air, leaves changing colors, pumpkin patches, and, often in the nature of decor, scarecrows.

The variance among types of scarecrows is vast and the images that one might conjure when thinking of them equally so. The popular likeness that comes to one's mind is that of a set of patched clothing stuffed with hay and a floppy hat stuck atop a head made of a sack, all, of course, balanced atop sticks connected to make a cross-like frame. In seeing one such as this, one might think of the ever popular scarecrow going in search of brains or one might think of a creepier scarecrow, such as that brought to life by Mother Rigby.

Furthermore, in purpose, they may serve as an attempt to keep the birds away, which may or may not work dependant on one’s scarecrow. In the event that it fails to keep the birds aways, though, one should not feel discouraged, but should think of it as an opportunity to start the hobby of bird watching and quite possibly as a means of exercise if one decides not to take up this hobby.  Aside from the more purposeful use, they also can be a delightful addition for a pumpkin patch, inviting all ages for a day of country fun along with the possible tractor and hay.

Be they cute or scary and for whatever purpose, though, it is undoubtable that during the next few months one will see scarecrows gracing lawns and gardens, as well as adorning various decorations that go up with the coming of autumn.      

Thursday, September 6, 2012

On Ice Cream

July 1947

When the weather becomes unbearably hot and sticky as it has been of late, there are few foods that hit the spot quite as nicely as ice cream! And undeniably, this delectably cold dish is one that offers a tasty relief from the heat of summer!

While a wonderful treat by itself, there are a great variety of ways that one can use ice cream, such as for making sundaes, pies, and milkshakes. At the time the above picture was taken, The Good Housekeeping Cook Book offered a number of ways to serve it ranging from Ice Cream Shortcakes and Ice Cream Ginger Ale (also known as a Boston Cooler despite originating in Detroit, Michigan) to, on the more unique side, Pineapple Minted Parfait and Spiced Grape Sundae. Although the latter two lack the appeal of the others with some rather interesting ingredient combinations, they certainly provide one with an example of how ice cream can be used in just about any way imaginable!

Hence, with so many varieties to choose from and with so many ways to add to it, ice cream is and will remain popular among all ages allowing everyone to indulge in whatever their fancy may be!

Thursday, August 9, 2012

On Improvising When Sewing a Skirt

When one goes to sew a skirt there are specific guidelines that one attempts to stick to, but often other factors get in the way and lead to the need for improvisation.

Having enough fabric is one thing that most consider. Generally this is thought of when buying the fabric in regards to how much the pattern calls for. Other people, like myself, become enamored with the fabric, instantly decide that it would make a wonderful skirt (with a fleeting thought of looking through patterns later), and when getting to the counter to request 3 yards, only to find that there are about 2 yards, still feel confident that there will be sufficient fabric to make a skirt. In reality, one should not feel this confident unless they are an expert seamstress, but excitement and over determination often prevent this thought from coming to mind.

Once the fabric is home and has been washed, one can happily sit down with their shoebox full of patterns and select one such as this:


Eloise, because she looks like her name would be Eloise, is quite proud of her bolero and skirt. Evelyn in the background is too. (Simplicity Pattern 3773, 1951)
Finding the pattern piece to be too long, it is decided that the skirt can do with being a bit shorter and the pattern is folded at the base. It is then discovered when placing said pattern on the fabric that there is only enough fabric when cutting with the selvage to cut out six sections, not the called for eight, and one decides that having a smaller waist than the measurements given for the skirt that this is acceptable. Alas, when two panels of three sections have been sewn together, a quick attempt to hold and wrap them around one’s waist proves that six was not sufficient and there is the need for another section.

Ready to be sewn together!
Now begins the great debate as to what should be done about this misfortune. One, a second visit can be made to the fabric store to search for more of the same fabric, pointless in this case because there wasn’t any. Two, the entire project can be resigned to the “failed dress pile”, which is a rather sad fate for it. Or, three, find a way to make another panel. Choosing the later of the three may make it seem as though the only other option is to select a complimentary color fabric, which brings about a  great deal of frustration as one tries to find an exact match. However, there is a solution for this situation! With the remaining bit of fabric that was cast aside after the cutting of the other pieces and by folding the pattern in half one finds that there is enough remaining fabric to cut multiple pieces and sew them together to create a full size piece to match the others!

Improvised Section
From this point everything should go swimmingly as far as piecing it all together to form the actual skirt. It is when reaching the attachment of the snaps and hooks and eyes that one again begins to flounder a bit. First there is the finding of these supplies and if one is using vintage supplies and has them on hand they are apt to be of different types, sizes, and colors. Since they are on the inside of the skirt, though one should not worry and just be happy that they have something with which to make the skirt stay on.  After whatever is being used has been decided upon then comes the positioning of the snaps, which is fairly easy, and the hooks and eyes, which are not so easy to attach and hard to hold in place when trying to do so. Never-the-less, after struggling with this step one should have a beautiful skirt to wear at home or out and about!

Finished!