Showing posts with label 1970's. Show all posts

Saturday, September 24, 2022

On Some Yarn Crafting

Over the past couple of years I've been leaning a bit more towards crafting with yarn again. Not that I ever really stop crafting with yarn, it just becomes an element for something like hair for a doll rather than the primary supply for whatever I'm working on.

I tend to enjoy working with yarn and have a decent quantity on hand for someone who doesn't knit or crochet. When I was in elementary school, I used to make yarn dolls of the sort where you wrap yarn around a large book, in my case my dictionary, then pull off the loop and tie it off at the appropriate places, and then get a second loop to make up the arms. Then I when I was older I went through a very brief phase of making pompom ornaments (sheep and a cat, specifically).

Because knitting and crocheting present some obvious difficulties for me, it's not surprising that I veered towards an attempt at weaving. When I was about ten I found this 1970's loom at a thrift store for probably no more than a dollar and last year (or possibly the year before) I decided that I was ready to attempt making a sweater rather than randomly weaving squares that I never do anything with.


I picked up some yarn from the dollar store with the idea being that if I didn't finish at least I didn't spend a ton on the yarn. According to the little booklet that comes with the loom I need at least 35 squares. Moving at a snail's pace, I've now made six (one this week!). In part, this is because I became frustrated when I attempted one of the patterned weaves and couldn't figure out how to get it past the first section, which made me temporarily put the project aside. It will be interesting to see how long this endeavor actually takes me to finish. 

I also bought a 1960's Knit-Wit flower loom last year. At this point, I've made five simplistic flowers and think I have the hang of making them, though I haven't attempted connecting them yet. 


You can also use it to make diamonds, squares, and pom poms, as can be seen on the box lid, which I have yet to try. Apparently the kits each came with a different color yarn and instruction booklet for a few projects. Along with the original pink and white yarn, mine had the instructions for a flamingo, peacock, and crane! 

Because I was interested in trying to make a few of the other animals that were pictured on the basic instruction sheet, I decided to see if I could find some of the full length pattern books and ended up with three that were being sold together. 

 
The Family Classics one has clothing items, which, given how long I'm taking with the other loom, would probably take me about ten years to complete. 


As can be seen, the other two have some very 60's items in them.  
 
 
And the one book has lots of bottle covers! I find this waiter particularly funny!


Then there are things like this skiing doll, which would take quite a bit of yarn. 

I'm guessing the primary things I'll be making from these books will be the smaller animals and the Christmas ones (I did see a cute Santa decoration somewhere online that just involved making a flower and using felt for the face and hat), though I definitely would like to try making the mermaid. Either way, I have lots of fun options to consider for future yarn crafts!

Sunday, April 12, 2020

On Decorative Eggs for Easter

About a week ago I pulled out my 1973 copy of Easter Eggs for Everyone. This book is a mixed bag of history and cultural practices, methodologies for coloring eggs (the crepe paper idea is intriguing), a lot of suggestions on how to decorate them, and a section devoted to Easter egg games. 


Some of the suggestions given are more interesting, such as the Golden Eggs for the "mature egg crafter" who wants to glue pasta and seeds to their egg shells and then paint them. 


It also takes the very retro approach of making pigs, which are "fun to make and attractive to busy mothers who dislike the mess so often associated with Easter Eggs" by putting pieces of gumdrops into a hard-boiled egg. Along the same lines, are instructions for making miniature vases and candle using emptied eggshells.   

Other fun ideas consist of a Hawaiian Hula Dancer Egg Head and Moon Men and Maidens!


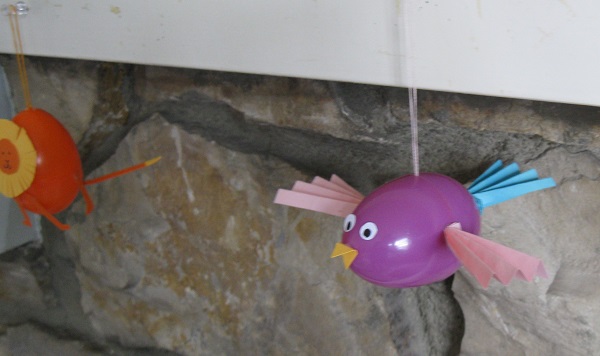
After perusing the pages awhile, I settled on being inspired by this book's ideas for animal eggs and made a lion, a rabbit, and a German inspired egg bird. Rather than use real eggs, I pulled out my childhood plastic egg supply, which having dwindled to a considerable number of mismatch-y colors has made it perfect for crafting, and used hot glue to attach the various paper bits and the rabbit's pom-pom tail. 

I didn't use the instructions in the book, although under normal circumstances I would have actually liked to have tried making the rabbit using powder puffs for the ears and feet as they suggest. At a later date, I might have to have a rabbit making craft day!   


And to end this post, here is a picture of Mrs. Muzzlesworth my aged styrofoam egg bunny that belonged to my grandma.


Hope everyone has a safe and happy Easter! 
♥️ 🐇 ♥️     

Sunday, April 28, 2019

On Some Newspaper Clippings from the 70's: A Photo Post

I was going through a box of old papers today that included quite a few newspaper clippings with mention of family members and found myself equally delighted by the backs of them. 

This outdoor art show included "artists in action" and the exciting "Sculpey," which think is referring to polymer clay. 


Buy some cutlery, stainless cookware, or a rocker recliner for the holidays.


Longhorn cheese anyone or sliced fresh beef liver, anyone?  


And from what can only possibly be a school newspaper (this one is dated 1978), some teen advice and requests for magazine replacements.
 

Apparently Hot Rod, Car Craft, Seventeen, and Consumer Reports were popular enough not to return to the library. 
 ♥️ ♥️ ♥️

Monday, May 21, 2018

On Turning My Jeans into Bell-Bottoms

Usually I am quite happy to let my jeans develop holes in the knees, but on a rare occasion I decide that I would much rather alter my jeans (this once resulted in monster faces on the knees, but I promise today's post is much more normal). 

This particular pair was in fairly good shape, with the exception of one knee, and as these jeans actually fit me, I really wanted to find some way to freshen them up. My solution was to replace the leg section that fell below the knee and make them into bell-bottoms. 
Front
Back

While originally I choose a floral, when I saw this fabric I knew that I'd regret it if I didn't buy it instead and while it might not really match the prints you'd see on 60's and 70's jeans, it still definitely looks dated.   


There's not much to say about the construction of these as everything was pretty basic. I cut out the pieces making sure the back piece was cut slightly wider, sewed them together at the side seams, top-stitched them on the inside seam to match the top-stitching on the jeans, and then turned them inside out to attach it to the upper leg of the jeans. I also lined them with what has to be the softest quilting cotton I've ever bought. 
 As a final touch with the leftover fabric I made a matching hair scarf, which is just barely visible in the photo!  
♥️ ♥️ ♥️