Showing posts with label Clothing. Show all posts

Saturday, December 21, 2024

On a Little Bit of Carroll Fun!

Still here...just can't manage to get all the posts I've started writing up in a timely manner and I was determined to get this one up before the year ends!

In October, I had the pleasure of going to the opening of an exhibit on spectral science and technology and a magic lantern show. 

This required the making of a coat, of course. A fellow Carrollian brought this marvelous Mad Masquerade by Riley Blake fabric, which is made up of advertising cards with illustrations from Carroll's Alice books, to my attention quite some time ago, but I'd been putting off using it because it's such a busy print and I wanted something that would do it justice. I ended up deciding that my revised pattern version of McCall's 9130, would do very nicely. 

Aside from choosing to cut it out during a heatwave and not really clearing enough space to do so in a convenient manner resulting in very sore muscles for several days, this coat came together without too many issues. As an added note, unlike last time I made it, this time I happily remembered to include facings and the front seam allowance.

Normally I would spend a significant amount of time searching for the perfect buttons. Nothing I looked at seemed quite right for this coat, though, and then I couldn't decide between what I did have. As a result, there are two round metal buttons, two grey rose buttons, and two cream colored rose buttons, which I find perfect considering the theme.


A wide width ribbon tied in a bow finished off the outfit! 

As for the exhibit, the big highlight for me was seeing a distorting mirror that belonged to Lewis Carroll! As you can see, I was upside-down with delight over it! 

Other fun things included a board of Houdini's keys used by his wife in attempts to contact him after he died (part of continued efforts to expose frauds, which became a large part of Houdini's later life), a variety of magic books and tricks, and several magic lantern projectors. 


As someone who doesn't go out and about often, it was a delightful event to attend! 

❤ ❤ ❤

Saturday, January 9, 2021

On How to Make a Rocking-horse-fly Fascinator (A Semi-Tutorial)

Happy New Year, everyone! 


When the Lewis Carroll Society of North America announced they were having a virtual Through the Looking-Glass cocktail party to kick off the year that marks the 150th anniversary of the book, oddly enough one of my first thoughts was "I want to make a hat for this." Specifically I was thinking the hat Alice wears on the train in Chapter 3, but then after further reflection (pun intended☺) I decided it would be more fun to make a crown using felt or thick interfacing (with my hair frizz and having lost combs and entangled brushes in it, the White Queen has always had my sympathies). 


Then I jumped brooks again, so to speak, and suddenly had the idea of making a Looking-Glass insect fascinator...then I went back to wanting to make a crown and after some thought about the ball on top of the crown, decided I really liked the Rocking-horse-fly and would love to wear one on my head.


Having made my decision, I set about making one. The following indicates what you need to make one and how I went about making my own (hence the semi-tutorial, since this isn't going to be very exact).

Supplies I Used

  • Printed Tenniel illustration of the Rocking-horse-fly (I sized it down to 2 1/2 x 3 5/8 in.)
  • Balsa wood
  • Floral wire (I used two two separate gauges, no idea what gauge since I don't have the packaging for either, just that one is thicker and the other very thin)
  • Fake ivy leaves
  • Green felt
  • Acrylic paint
  • Clear plastic sheet
  • Glue (I used both Tacky glue and hot glue)  

I dragged this out over a few days, but theoretically this could be completed within a day.

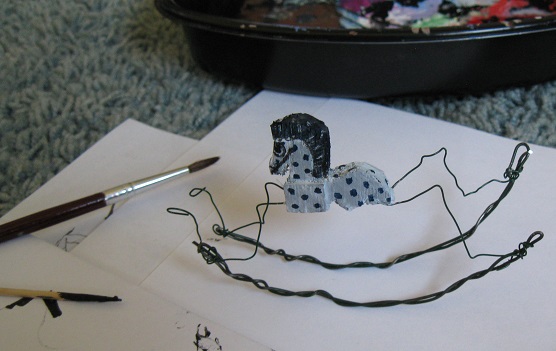
Because the illustration is conveniently a side view, I started by sizing it down, printing it, cutting out the body, and then tracing the outline directly on the balsa wood twice. I then carefully cut it out (managing to break one piece in half in the process). For the side I cut a small square which I then carefully spliced in half to get an even thinner sliver. I glued the two body pieces together and then glued one square sliver on each side to get the slight edge seen on the front of the body in the illustration. 

Next came the rocker and legs. For the rockers, I folded the thicker wire in half (folding over the ends) and twisted it together to so it wouldn't look quite so smooth and to give it a little more stability. 

For the legs, placing the thinner wire on top of the illustration, I folded it to match with a little extra on both ends for attachment purposes and cut it.

 
Following that, I wrapped the bottom of each leg around the rocker pieces and then spent a half an hour trying to get all four pieces to stay pushed and glued in to the balsa wood...it was the classic case of getting one end to stay and having the other pop out simultaneously minus the springy cartoon noise.   
 

Next, I cut out the wing pieces from the illustration, traced them on a clear acetate sheet, and cut them out. I then put the clear wing pieces on top of the illustration piece to trace the lines with ink. This was a bit backwards, as it really would have been easier to do before cutting them out of the larger sheet. I also should have used paint to avoid the ink smearing. 

After that, I switched over to the base. For this I cut a piece of green felt into somewhat of a squiggly edged triangular shape. Then for the leaves I cut a few off a dusty fake ivy plant in the living room that has finally made itself useful. They weren't quite the right shape, so I trimmed them down to look like the illustration and then attached them to the felt using hot glue.


Next came painting. I started out with a glossy blue paint mixed with white because the text states Alice "
made up her mind that it must have been just repainted, it looked so bright and sticky," and the glossy paint certainly looks that way, but I decided I really did not like the light blue and ended up repainting it gray. The glossy blue did get used for the spots, though! I used a toothpick to do the eyes and bridle.

To finish off the body, I attached the wings by dipping the very tips in some Tacky glue and holding them to the sides. 


To finish it off, I fought with the leaves and with a few stitches around the rocker portion finally attached the Rocking-horse-fly to the felt in front of the leaves. Rather than attach it to a headband or clip, I opted to just use bobby pins to hold it in place and that worked out just fine.

And with that, I created something one can proudly wear on their head whether one chooses to drink treacle and ink, put cats in their coffee or mice in their tea, sand with the cider or wool with the wine, as one makes a toast to Queen Alice on her 150th anniversary!

♥ ♥ ♥

Thursday, October 29, 2020

On a Wednesday Look for Tuesday

Posted on a Thursday!

I've been wanting to make a spiderweb collar for a few years, but never seemed to be able to get around to it. This year knowing I wouldn't have time to finish either the spiderweb dress or spiderweb skirt that have also been on my "to sew" list for awhile before the month was over (not that I ever feel spiders should be limited to October), I went for the collar. 

I thought about a few ways of going about making this and ultimately, which is a little hard to see in the photo, decided on a white gauze base to give it a wrinkly look with a sheer layer for the top to give it a little sparkle. Then I machine stitched the web on top of both layers with metallic thread! To finish it off I opted for a snap and a round pearly button sewn on top.

Paired with a black shirt, a spider necklace, and a mirror in need of cleaning, this is my official Wednesday on a Tuesday posted on a Thursday look.

                 ♥ ♥ ♥

Saturday, October 24, 2020

On a 60's Secretary Skirt

Or at least that's what I'm referring to it as. 

Finding that over the past eight months that most of my clothes have become too big for me, one of the go to items in my closet has become one of the very first items I made from a vintage pattern in 2009 or 2010, a drawstring  polk-a-dot skirt from the 1968's McCall's pattern 9398 (which while I've certainly thought about it, I'm now realizing has never made an appearance on this blog). Last month it occurred to me that given how often I was wearing this skirt, I might want to make a few more.  

Given that I've hardly sewn anything with knit since I first started sewing clothes, I was excited to see what I'd find in the flat folds section of the outlet fabric store I frequent and ended up with what I deemed two very 1960's appropriate fabrics. This one is a synthetic, which I try to avoid, but the texture was so perfect I couldn't resist it!

There's nothing fancy about this pattern, it's just two basic rectangles sewn at the side seams with a folded over top to create a casing for a drawstring, two holes for the drawstring, and a hem. I decided to forgo the fabric drawstring and substituted a ribbon. 

Because I have extra fabric, I'm thinking of eventually making the coat from this 1967 pattern and spent some time trying to figure out if I had enough fabric left to do so.  

Since I'll need to grade down the pattern to a smaller size and will also need some fabric for lining and the collar (leaning towards white with large red polk-a-dots!), it probably won't be for awhile. 
 
Meanwhile, I think it pairs perfectly with my black bolero, white t-shirt, and the sunglasses that were my grandma's to give a perfect 60's look! 

And for an October extra, since I'm trying to be better about remembering to take pictures of them, my spiderweb brooch! 

♥️ ♥️ ♥️

Saturday, July 4, 2020

On a Dress for the 4th of July!


This started with the fabric I used for the bodice, which was given to me and as such creates the interesting challenge of trying to figure out what pattern matches the length I have rather than picking the fabric based on the pattern requirements. This fabric piece was fairly small and also had fading down the center to work around making it even more challenging.

Enter the 1946 version of Simplicity 1682, which has the advantage of three separate pieces and is very simplistic in terms of not having any tucks, darts, pockets, or really anything else you might need extra fabric for unless you do an overlay. 


My sole trip out of the house to a store since March was motivated by fabric for this dress and they were out of navy blue broadcloth. Being horribly stressed about being out to begin with, I was not going to try to find the right color elsewhere and after a quick browse through the fabrics, I came across a lighter weight and looser weave homespun fabric. I'm not sure that it's really appropriate for clothes, but it has a nice flow to it and it's soft, so at the moment I'm going to be happy with.


Some details about the construction...The silly inset (or rather of lack of inset) on Style 1 caused me some issues, since I was doing the solid inset from Style 2 and should have switched over to that part of the instructions at step 5. I attached the front piece and had top-stitched it to the bodice before realizing that both it and the facing were meant to be stitched at the same time (fortunately I hadn't attached it to the skirt yet). This meant either ripping out the seams and starting over with both or handstitching it in. I went with the later because I'm at the end of the blue thread I was using.


This was my first time making puff sleeves! I adore puff sleeves, but oddly enough I only have a few patterns that have them.

On the subject of sleeves, I also ended up making my own bias tape for this project to use on the sleeves and neckline, since what I had was a more orange-y shade. This was one of those patterns that the measurements were all over the place (3/4 inch seam allowance except for some seams that were 1/2 inch seam allowance, but only mentioned on the pattern pieces), so I think it actually should have been 1/4 inch, not a 1/2 inch in width. It does create a nice pop of color, though, when it's a little wider!
I'm going to be honest and admit the past couple of weeks have been hard on me and I wasn't really in the right mindset to be sewing this, so getting this done was a struggle. That being said, my V for Victory pin is just as much for getting the dress done, as it is to match the dress.

And to conclude this, a silly picture with the mop cap my friend's mom made me in 5th grade for our Walk Through the American Revolution day and the keys that hang beneath it.


Happy Independence Day to my US readers!

Saturday, December 1, 2018

On Clip on Earrings Turned Into a Sweater Clip and Other Swap Meet Things

While visiting the swap meet a few months ago in search of a green sweater for my rose bush costume, I came across these clip-on earrings, which while not exactly matching any thing on my lamp, I decided were too cheerful to pass up especially since they were only a dollar. It also gave me a really good excuse to attempt turning a set of clip-on earrings into a sweater clip, which I've been wanting to try for a while. Aside from struggling to get the chain open with a pair of needlenose pliers because I didn't have any gold jump rings (something I plan to remedy before doing this again), it was remarkably easy to loop the chain around the hole at the edge and comes with the benefit of getting to enjoy my clip-ons without my ears feeling like they're going to fall off. 


Other vintage findings included a handful a pins, a small blue bag, and these two lovely framed prints (now dubbed Lady Grace and Lady Prudence). 
♥️ ♥️ ♥️

Friday, May 11, 2018

On An Owl Cardigan

I'm a pretty big fan of owls, but up to this point other than this dress most of the owl related thing I have are jewelry in the form of a handful of necklaces (several here) and what I refer to as my pin parliament. 

Recently, I decided to see if I could find either a vintage or vintage style owl sweater or cardigan and was very pleased to find this one. While I think it's actually 80's, it has enough of a vintage feel to it for me and I really like that the style veers away from being overly cutesy or tacky and instead looks much more collegiate than a lot of the other owl adorned clothing items out there. Also, it has large buttons!


♥️ ♥️ ♥️

Wednesday, April 25, 2018

On Antique Store Finds!

Yesterday I stopped off at the antique store while running some errands and ended up bringing home some fun new to me things!

Last time I was there, which was early fall, I saw a velvet purple cow toy that I decided to pass on and periodically since then I've thought about how I wish I would have bought it just because it was so funny looking. It was still there and I now own this tipsy little creature (and, in honor of national poetry month, I agree I'd rather see than be one) making it my second purple cow to come from this antique store. As I mentioned to a friend, propping it up with and positioning it next to the milkmaid was completely unintentional, although she does look appropriately shocked to see it.


Here's a better look at the above lunch set, which still has its original label and is still stapled to it's cardboard backing. 


The final photo I have to share is this straw hat, which I love in part because it makes me think of Disney's Swiss Family Robinson. It's in great shape with the exception of the one flower, which I'll have to repair, and I'm looking forward to getting to wear it in warmer months!


Other than these I also came home with a small artist palette brooch, purple scarf, a ziplock bag of vintage sequins, and a wonderful beaded bolero.


♥️ ♥️ ♥️

Friday, April 20, 2018

On a Vintage Corduroy Dress

Last month I came across an item that's been on my vintage wish list for a while, a corduroy dress and to make it even better it's red! Based on the style, the sizing, and a few other things, I'm guessing it's late 1950s or early 60's.  

While we seemed to be heading toward warmer weather, a couple weeks ago we had a few days of cooler temperatures and I knew I had to wear my dress before it got too hot and I'd have to wait months before I could wear it again.

This dress has a lot of interesting details that I love with the skirt being made up of panels that aren't really visible in these photos and the bodice having not only some small pleats, but a bow and buttons as well.


Admittedly, I'm still not sure what I think about the bows and the pleats under them on the back. 


I almost always forget to share a photo of the pin I wearing, but I'm trying to make more of an effort to remember to include one. I ended up with this tiny poodle in a lot of pins I found on etsy, which seemed much more suited to the dress than the other pompous poodle I tend to like to wear with black and red outfits. 


Other than needing the hook part of the fastener sewed on again and the side seam right above the pocket needing a few stitches, this dress is in wonderful condition. Interestingly, construction wise, the tops of the pockets were left open and unpinked. To me this seems somewhat odd for a fabric that frays like crazy (my leggings and shirt had red fuzz all over it at the end of the day), although most of vintage dresses either have a patch pocket or no pocket at all, so maybe it's more common than I realize.

(The second, third, and fourth photos taken by my co-worker.)
♥️ ♥️ ♥️