Happy New Year, everyone!

When the Lewis Carroll Society of North America announced they were having a virtual Through the Looking-Glass cocktail party to kick off the year that marks the 150th anniversary of the book, oddly enough one of my first thoughts was "I want to make a hat for this." Specifically I was thinking the hat Alice wears on the train in Chapter 3, but then after further reflection (pun intended☺) I decided it would be more fun to make a crown using felt or thick interfacing (with my hair frizz and having lost combs and entangled brushes in it, the White Queen has always had my sympathies).


Having made my decision, I set about making one. The following indicates what you need to make one and how I went about making my own (hence the semi-tutorial, since this isn't going to be very exact).
Supplies I Used
- Printed Tenniel illustration of the Rocking-horse-fly (I sized it down to 2 1/2 x 3 5/8 in.)
- Balsa wood
- Floral wire (I used two two separate gauges, no idea what gauge since I don't have the packaging for either, just that one is thicker and the other very thin)
- Fake ivy leaves
- Green felt
- Acrylic paint
- Clear plastic sheet
- Glue (I used both Tacky glue and hot glue)
I dragged this out over a few days, but theoretically this could be completed within a day.
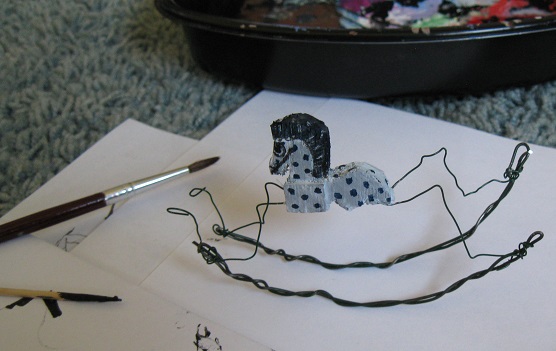
Because the illustration is conveniently a side view, I started by sizing it down, printing it, cutting out the body, and then tracing the outline directly on the balsa wood twice. I then carefully cut it out (managing to break one piece in half in the process). For the side I cut a small square which I then carefully spliced in half to get an even thinner sliver. I glued the two body pieces together and then glued one square sliver on each side to get the slight edge seen on the front of the body in the illustration.


Next came the rocker and legs. For the rockers, I folded the thicker wire in half (folding over the ends) and twisted it together to so it wouldn't look quite so smooth and to give it a little more stability.
For the legs, placing the thinner wire on top of the illustration, I folded it to match with a little extra on both ends for attachment purposes and cut it.


After that, I switched over to the base. For this I cut a piece of green felt into somewhat of a squiggly edged triangular shape. Then for the leaves I cut a few off a dusty fake ivy plant in the living room that has finally made itself useful. They weren't quite the right shape, so I trimmed them down to look like the illustration and then attached them to the felt using hot glue.


Next came painting. I started out with a glossy blue paint mixed with white because the text states Alice "made up her mind that it must have been just repainted, it looked so bright and sticky," and the glossy paint certainly looks that way, but I decided I really did not like the light blue and ended up repainting it gray. The glossy blue did get used for the spots, though! I used a toothpick to do the eyes and bridle.


To finish it off, I fought with the leaves and with a few stitches around the rocker portion finally attached the Rocking-horse-fly to the felt in front of the leaves. Rather than attach it to a headband or clip, I opted to just use bobby pins to hold it in place and that worked out just fine.
And with that, I created something one can proudly wear on their head whether one chooses to drink treacle and ink, put cats in their coffee or mice in their tea, sand with the cider or wool with the wine, as one makes a toast to Queen Alice on her 150th anniversary!

♥ ♥ ♥
This is so amazing I can’t even handle it 😍
ReplyDeleteThanks! I'm so pleased with it, I just keep staring at it and thinking how perfectly it turned out, haha.
DeleteBrilliantly creative design! Those wings are incredible - as is the whole chapeau.
ReplyDeleteYou just know that Mr. Carroll would have thoroughly approved!
Autumn Zenith 🧡 Witchcrafted Life
Thank you!
DeleteI very much think he would have too. Some of the other LCSNA members were asking if I'd be making the other insects(including the not included in the final text, Wasp in the wig) and since I was toying with the idea already, I think a few more of the TTLG insects may be joining this one as the year progresses. 😃