A happy new year to come!♥
Tuesday, December 31, 2013
On Staying Awake Until Midnight
On New Year’s Eve it can sometimes prove
difficult to stay awake until midnight. One starts out fully alert, but as the
night wears on, it becomes harder and harder to stay awake. Suddenly it seem as
though every night one had failed to fall asleep quickly throughout the year
has caught up with one all at once. A valiant effort not to give into this must
be made. However, this is easier said than done and shortly after this
resolution has been made, yawning commences. First, one tries to ignore that
they need to yawn, which then turns into an attempt to stifle it. Stifling
doesn’t work and one finds themselves giving in to a continuous amount of
yawning. Finally, just as one thinks they cannot possibly keep their eyes open
a second longer, the clock strikes twelve, bringing with it happy New Year’s
noises and bringing one back to the point of being fully awake and ready to face the new year!
A happy new year to come!♥
A happy new year to come!♥
Monday, December 30, 2013
On “The Brontes Went to Woolworths”: A Book Review

Title: The Brontës Went to Woolworths
Author: Rachel Ferguson
Genre: Fiction
About the book…
Written in 1931, Rachel Ferguson’s The Brontes Went to Woolworths pulls the reader in the imaginings and realities of sisters Deirdre, Katrine, and Shiel Carne and their mother as they interact with the world around them.
What I think…
This is one those books that, in addition to being on the bizarre side, takes awhile to get to a point where you have an understanding of what’s going on.
Throughout the first few chapters I had difficulty figuring out that some of the people being discussed, while real, where being described in a way that the Carnes family had imagined them to be. This confusion made it challenging to get into the book at first, but you do adjust and catch on to it quickly even if not entirely.
The narration and dialogue is fast paced and a bit frenzied, although I felt this was in keeping with the primary narrator, Deidre, and the way the entire family acts. Going off of that, multiple times the viewpoint does switch over to other characters, which definitely helps clear up some of the questions that arise as you are reading. It also makes a difference when the imaginings and realities cross over. Furthermore, this aspect does result in the characters coming across as slightly annoying at times, but in a charming sort of way (if that makes any sense).
In regards to the title, while the Brontes did play a role in the story, there was a lot less focus on them than I expected, although I really did like the way Ferguson tied them into the story.
Despite all these things, though, I was rather sad when I got to the end and I would consider this a book that I’d be willing to read again.
To sum it all up…
Great novel if you’re looking for something different from the norm and like quirky books, not so great if you don’t want to keep track of imaginary lives versus real ones.♥
Sunday, December 29, 2013
On My Christmas Skirt and Blouse
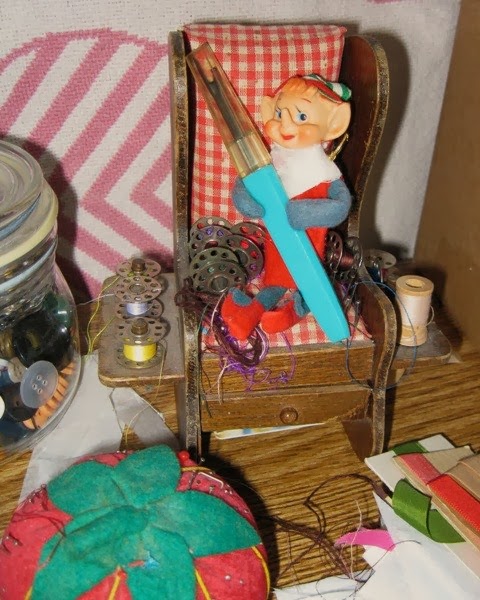 |
| My sewing elf |

Because I had about 5 yards of it there were a lot of options for what I could make, but I decided to go with a classic circle skirt with added benefit that it would go perfectly with a red blouse I had started making last month.


This skirt pattern is one I had made before, last December on the day after Christmas to be exact, and while I absolutely love the finished skirt, I do not love Butterick’s lack of labeling pattern pieces in their instructions.
After sewing the panels together, struggling to get the zipper to match the seam (despite all the pins, it kept moving), and doing some waist adjustments, I realized when I went to sew on the waistband that the zipper was sewn on the wrong side. Being a circle skirt, one might think this doesn’t matter, but at least in the case of this skirt the curve at the top of the front piece is larger meaning that it has to go in front. I ended up tiredly debating for about twenty minutes if I really wanted to go through the trouble of removing the zipper and finally came to the conclusion that: a) I really didn’t want to rip out the zipper and struggle with it all over again, b) I’ll probably only wear this skirt a few times a year because it’s a Christmas print, c) Despite efforts to avoid it, the waistbands usually get sewn on with the overlap on the wrong side, so here was my chance to sew it on backwards and not have to worry about ripping the whole thing apart to fix it! and d) I may have been wearing my other skirt backwards all year. Also, did I mention this was the evening of the twenty-third?
On Christmas Eve, I attached the waistband and did the hem before going to bed with the idea of sewing on the hooks and eyes in the morning. Christmas morning I started to sew them on, only to discover on one side of the zipper the waistband had been sewn about a ¼ inch higher…sigh…so I ripped out the stitching for about two inches, readjusted and sewed the waistband back on, and finished with the eyes. All this trouble, but the skirt was done for Christmas!!! Yay!!!


Outfit Details
Blouse-me-made
Circle
skirt-me-made
Reindeer brooch-thrifted
Gold clutch-thrifted
♥♥♥
Wednesday, December 25, 2013
On Wishes for a Very Merry Christmas!
I hope everyone has a very merry Christmas!
 |
| One of my favorite Christmas decorations. |
♥♥♥
Friday, December 20, 2013
On Making Vintage Fabric Scrap Lollipop Ornaments
Welcome to the second half of my ornament making tutorials,
which I’ve had typed for a week and just couldn’t seem to get the pictures
taken for! Along with the trees in the last post, were also this collection of
fabric scrap lollipops (or as I like to call them, my fabric swatch collection
of unattainable fabrics. :) ) What I like about these is that they’re super
simple and they can be made quickly!

² Small styrofoam balls (1 ¼ in diameter for this size)*
² Fabric scraps that can
be cut into squares
² Pinking shears
² Rounded thin wooden
sticks or the lollipop sticks you can find in the baking section of the craft
store. (5 ½ inches long is a good length)
² Ribbon (or yarn or
string…anything that will tie)
² Christmas tree hooks
² Glue (optional)
*Note: One of the lollipops I have
was tied with a twisty tie, so I decided to replace it with a ribbon. Upon
removing the fabric I discovered that it had been made, unlike most of the others, with a slightly smashed up
silk ball ornament and since I’m lacking in a styrofoam ball to use for this,
this is what you’ll be seeing in the photos. 1. To create the lollipop, take the stick (dip the end in glue if you want it stay in firmly) and push it into the styrofoam ball.
2. Using your pinking shears cut your fabric into a square that is at least 6 ¼ inch on each side. It doesn’t have to be a perfect square, but you do want to make sure that when you put the fabric over the ball that the ends won’t be too short to be tied down.
 |
| Yes, I know this is not a square. This is the original fabric from this ornament and that's how big it is. |
 |
| Edges matched up! |
 |
| A sweet addition for your tree! |
♥♥♥
Saturday, December 7, 2013
On Making a Vintage Fabric Scrap Christmas Tree Ornament
With
Christmas fast approaching, I thought instead of doing my regular sewing post this
week it would be fun to do a Christmas ornament sewing tutorial (quite possibly
to be followed by another one within the next few days).

Among the vintage ornaments I have, there are several really simple ones that were made by my grandma or great-grandma in the 60’s or 70’s. After my mom mentioned that she had had an outfit made out of one of the fabrics, it occurred to me that these trees would be great to make with some of the left over material and fabric scraps from various project I had made this year. Going through my fabrics I choose two prints, one from this blouse and another from a dress I have yet to share, and happily set about coming up with this tutorial. So if you want to make one of these adorable trees put on some Christmas music and follow the directions below!
Supplies
² Small pieces of fabric scraps
² Stuffing (I’m using
fiberfill, but anything that gives it body and will go into corners will work)
² 7 in. of 1/8 in.
ribbon
² Thread that matches your
fabric
² Small decorative things:
ric-rac, lace, bias tape, seed beads, pearls, sequins, etc…
Instructions
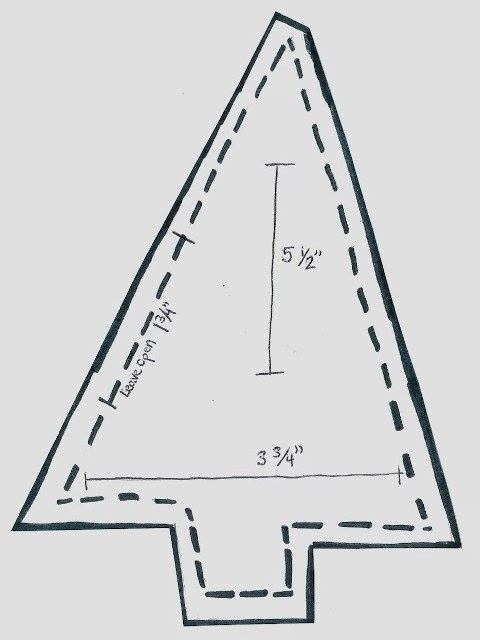
1. First,
decide what you want your tree to look like and create a template (I’m
including mine if you don’t want to come up with your own). Make sure to leave
at least a ¼ inch seam allowance.

2. Place the template on the fabric and
cut out two, making sure to flip template when you cut the second shapes so the
two pieces will match up when you put them together to sew.

 |
| I didn't iron until after I cut them, I would recommend doing that first, though. |
3. Put the
right sides of the fabric facing each other. Starting at the bottom of where
the opening on the side will be, sew the two pieces together ¼ inch from the
edge. (Make sure to leave the 1 ¾ inches on the side open!).


4. Before
turning, iron the seam back on the open side to form a crease. This will make
it easier to stitch shut.

5. Clip the corners/curves (don’t forget to clip the
corners at the top of the trunk). Then turn. Poke out corners as much as
possible (rods from tube turner sets are great for this if you’re concerned about
poking scissor tips or seam rippers through).
6. Fill and slip stitch the
opening shut.

7. Form a loop with your ribbon and sew it by hand to the top.
8. Now comes the fun part! Use your various
trims and decorate. For trim that goes round the tree diagonally, start at the
bottom and pin it as you wrap it around.
 |
| For the red I used ric-rac and seed beads. For the pink, fused pearls. |
9.
Hang your tree on the tree!
 |
| Two vintage and two new! |
If
you liked this ornament make sure to check out last year’s tutorial On Making a Vintage Look-alike Snowman Ornament. ♥♥♥
Subscribe to:
Posts (Atom)